![]() Example – An email verification API, TheChecker (opens new window)will be used as an example for how to create and edit a Mini-App.
Example – An email verification API, TheChecker (opens new window)will be used as an example for how to create and edit a Mini-App.
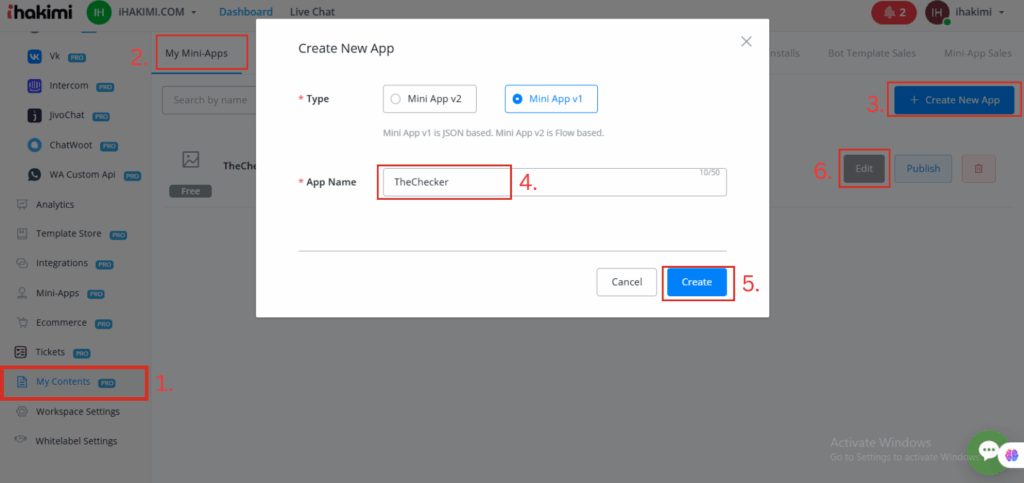
To create an app, follow steps 1 to 6 in the above screenshot.
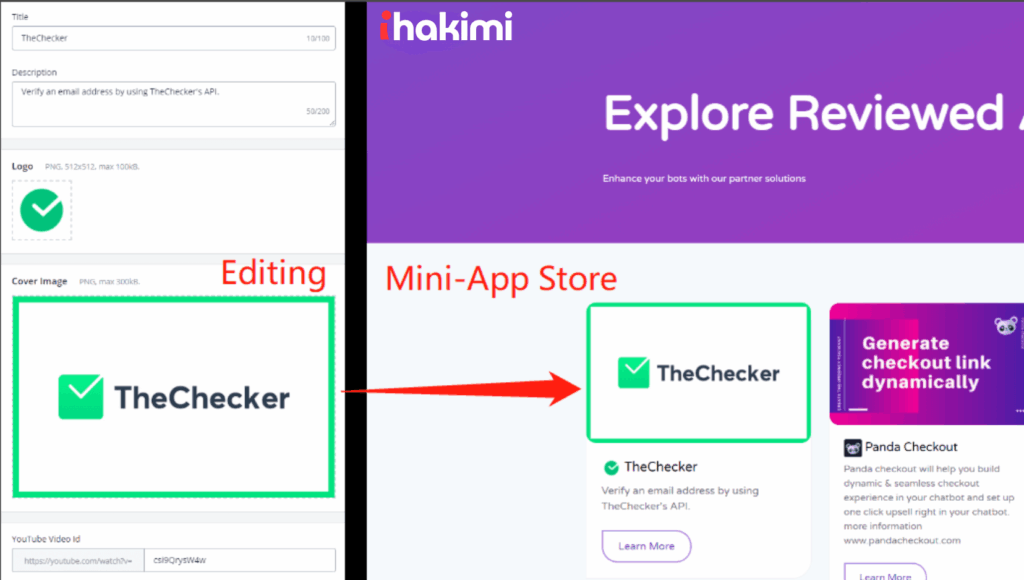
On the editing page (left), list a title, description, logo, cover page, YouTube video id and it will appear like this in the mini-app store (right):
On the right side of the editing page:
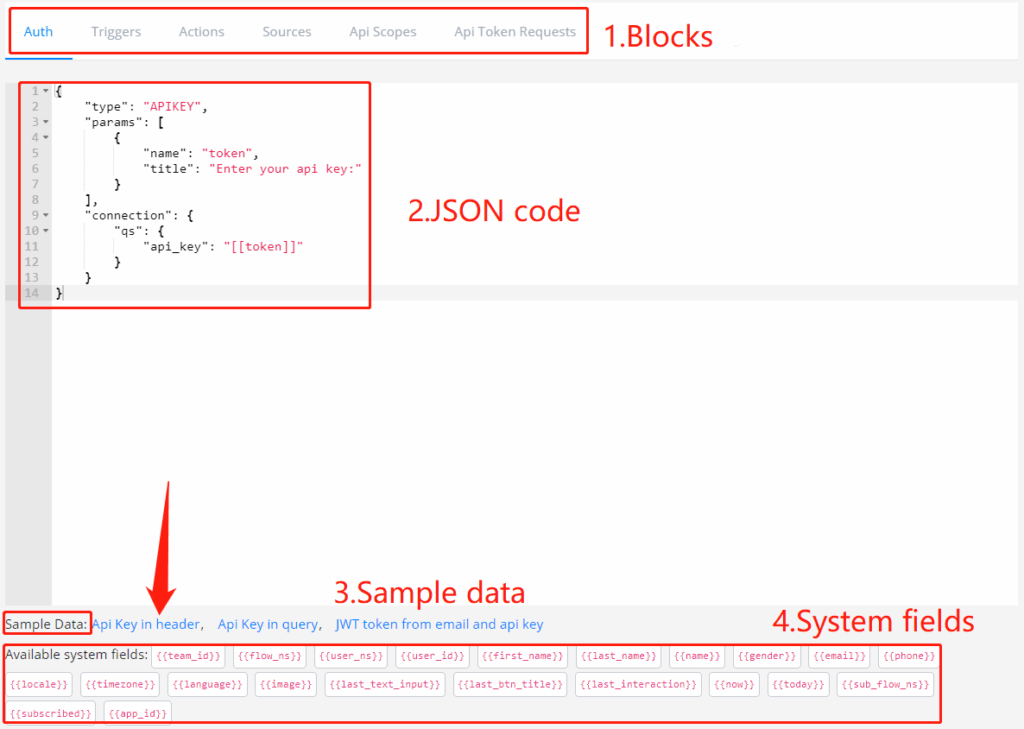
You can always use sample data at the bottom for guidance. And system fields are what you can use in your JSON code if needed.
Auth
This block is for setting authentications of your App.
Parameters
| Name | Data Type | Description |
|---|---|---|
| type | enum | Supported value: APIKEY |
| params | array | Values required from users when installing e.g. API key |
| request | object | Send requests with parameters (e.g. email, api_key) and map the response to params (e.g. token) |
| connection | object | List of request headers or parameters |
Email Verification Example
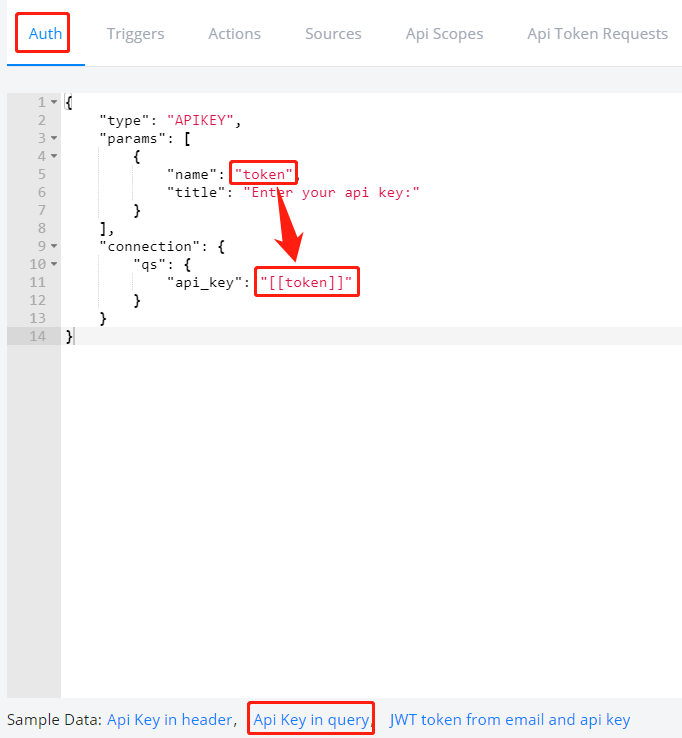
This is an authentication example with an API key in the query. As follow is how it will look like after users install the App:
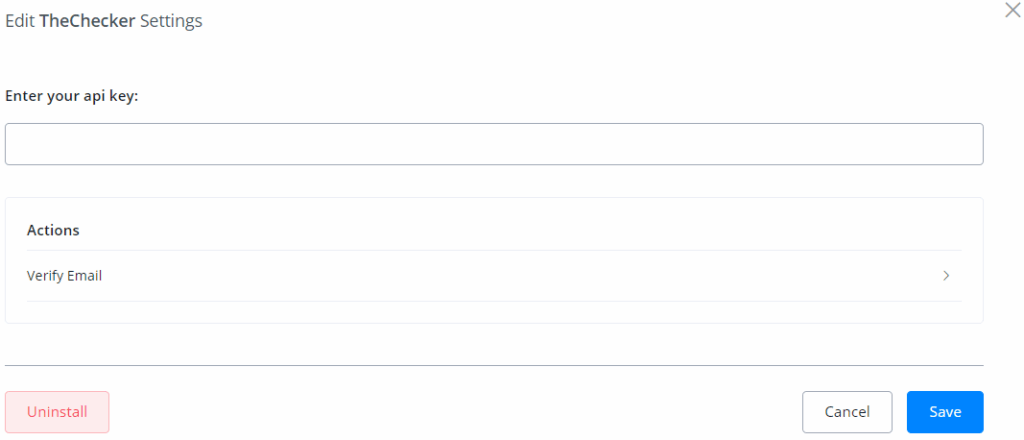
The “api key” set by users will then be stored in the variable “token”.
Basic Auth Example
![]() TIP – The basic access authentication requires the username and password joined by a single colon to be a credential and the credential encoded by using Base64. Given that the functions are not supported in the JSON code, the system will help you do the encoding. So you just need to put “Basic [[sid]]:[[token]]” as the authorization value.
TIP – The basic access authentication requires the username and password joined by a single colon to be a credential and the credential encoded by using Base64. Given that the functions are not supported in the JSON code, the system will help you do the encoding. So you just need to put “Basic [[sid]]:[[token]]” as the authorization value.
{ "type": "APIKEY", "params": [ { "name": "sid", "title": "Twilio Account SID:" }, { "name": "token", "title": "Twilio Auth Token:" } ], "connection": { "headers": { "Authorization": "Basic [[sid]]:[[token]]" } } }
Other Examples
Example 1: APIKEY Auth, headers
{ "type": "APIKEY", "params": [ { "name": "token", "title": "Enter your api key:" } ], "connection": { "headers": { "Authorization": "Bearer [[token]]" } } }
The “headers” in the “connection” will be added to each request, so you don’t need to repeat it everywhere later.
Example 2: APIKEY Auth, query parameters
{ "type": "APIKEY", "params": [ { "name": "api_key", "title": "Enter your api key:" } ], "connection": { "qs": { "key": "[[api_key]]" } } }
Same as above, the query string will be added to each request.
Example 3: APIKEY Auth, JWT token
{ "type": "APIKEY", "params": [ { "name": "email", "title": "Enter your email:" }, { "name": "api_key", "title": "Enter your api key:" } ], "request": { "url": "https://example.com/get-token", "method": "POST", "body_format": "form", "cache": 3600, //cache this request for 3600 seconds "payload": { "email": "[[email]]", "api_key": "[[api_key]]" }, "mapping": [ { "name": "token", "path": "$.data.token" } ] }, "connection": { "headers": { "Authorization": "Bearer [[token]]" } } }
The email and api_key provided by users will be sent as a request. Then the responses will be mapped to variable token by JSON path $.data.token. After that, it’s used as a variable [[token]] in an authorization header. Again, the header will be added to each request later.
Actions
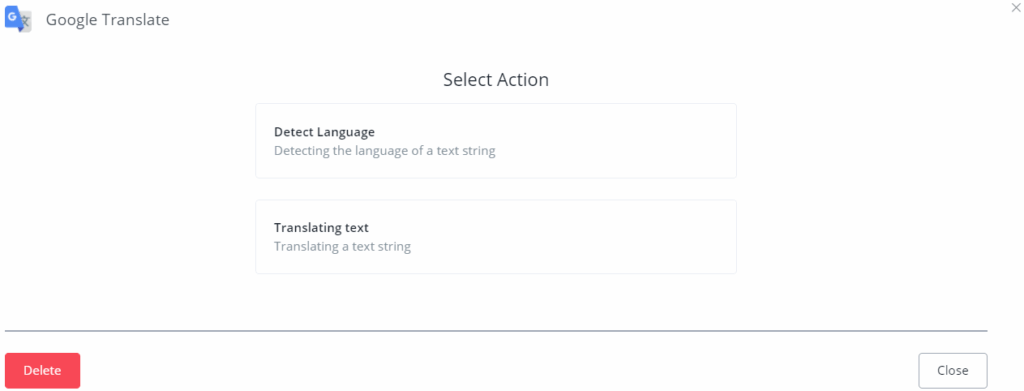
Actions are what functions/features users can do with your App. For example, this “Google Translate” App has 2 actions, “Detect Language” and “Translating text”:
In the coding area, you need to set the default information of the action, including name, title, description, forms and requests to make the action work in the flow with configuration.
At the bottom, click “Get product” for a GET request example, and “Update product” for a POST request example. The type of forms and requests are objects, therefore it needs to set several attributes.
Parameters
| Name | Data Type | Description |
|---|---|---|
| name | string | Identify the action, must be unique |
| title | string | Action title shown when using the app |
| description | string | Action description shown when using the app |
| forms | array | List of form objects for action configuration |
| requests | array | List of request objects to be performed in succession |
Form Object
| Name | Data Type | Description |
|---|---|---|
| name | string | Field name, used as an identifier and variable inside request |
| type | enum | Value type, used for validation, supported values: string, text, number and select |
| title | string | Field title, displayed in UI |
| default | string | Default value for this field, If specified, the field becomes optional |
| source | string | Name of the source in Sources block, only for type=select |
| placeholder | string | the grey prompt shown in the field |
| description | string | the prompt appears below the field |
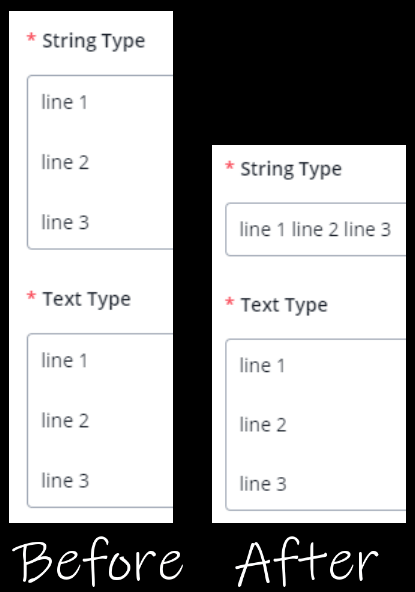
Lines in Text Variable
![]() TIP – The difference between string and text form type is that, string will remove the newline in the variable while text will keep it.
TIP – The difference between string and text form type is that, string will remove the newline in the variable while text will keep it.
Request Object
| Name | Data Type | Description |
|---|---|---|
| url | string | Request URL |
| method | enum | HTTP request method, supported values: GET, POST, PUT, DELETE, PATCH, HEAD, OPTIONS |
| headers | array | List of request headers in key value pair, e.g. {"Content-Type": "application/json"} |
| payload | json | Request body |
| body_format | enum | Request body format, supported values: json, query, form, multipart, raw |
| mapping | array | Set of fields for request results mapping into custom fields |
Mapping Object
| Name | Data Type | Description |
|---|---|---|
| name | string | Field name, used as identifier |
| type | enum | Field type, supported values: text, number, boolean, date, datetime, array |
| title | array | Field name, displayed in UI |
| path | string | String in a JSON path format |
Email Verification Example
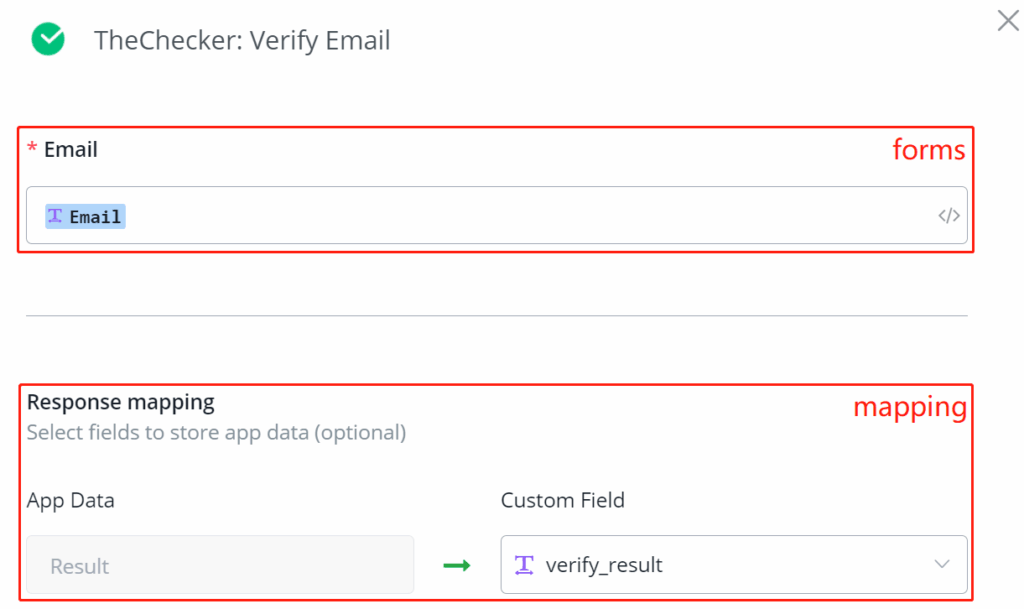
As follow is the coding for the email verification example and the UI in Action steps.
Code:
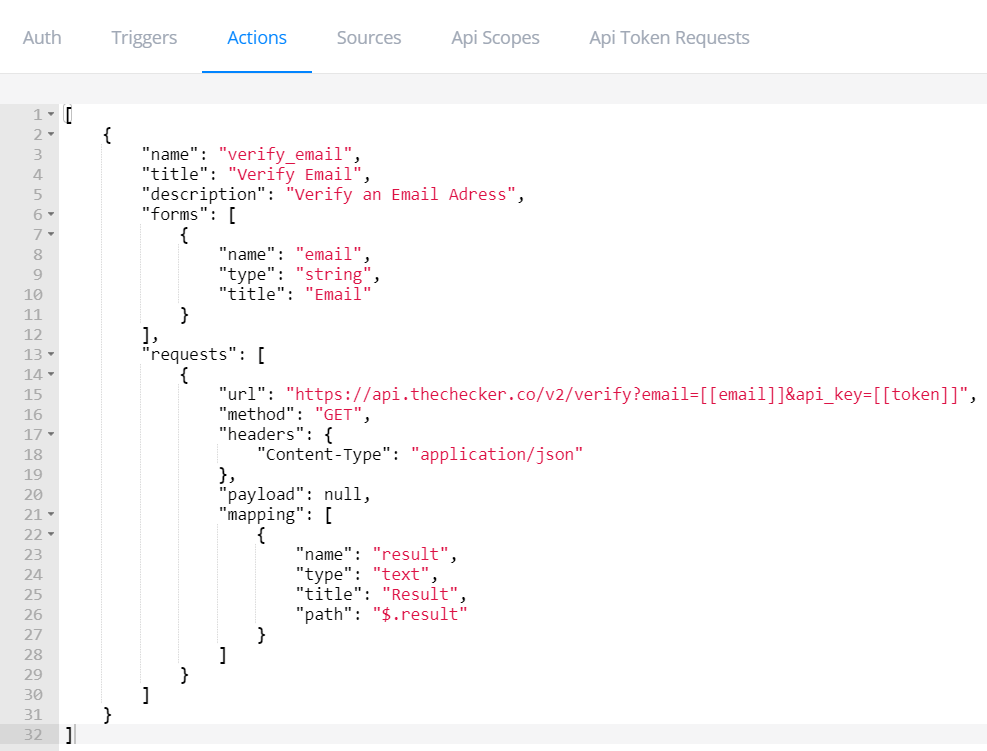
![]() TIP – You can remove the “api_key” in the URL because we’ve already added it in the Auth block.
TIP – You can remove the “api_key” in the URL because we’ve already added it in the Auth block.
App UI:

Other Examples
Example 1:
{ "url": "https://translation.googleapis.com/language/translate/v2/detect", "method": "POST", "headers": { "Content-Type": "application/json" }, "payload": { "q": "[[q]]" }, "mapping": [ { "name": "language", "type": "text", "title": "Detected Language", "path": "$.data.detections.0.0.language" } ] }
Example 2:
{ "url": "https://example/api/auth", "method": "POST", "body_format": "form", "cache": 3600, "payload": { "email": "[[email]]", "api_key": "[[api_key]]" }, "mapping": [ { "name": "token", "type": "text", "title": "Token", "path": "$.data.token" } ] }
Sources
Sources block is used to provide users with a list of options for the form value. Use the name of the source in the form parameter in the Actions block to build the connection.
There are 2 sources formats, static and dynamic. The options from a static source are fixed while a dynamic source brings changing options according to inputs.
![]() Note – sources block is optional, depending on the type of form objects in the Actions block.
Note – sources block is optional, depending on the type of form objects in the Actions block.
Parameters
| Name | Data Type | Description |
|---|---|---|
| name | string | Identify the source |
| type | enum | Source type, supported values: enum:rpc, enum:static |
| list | array | List of fixed options shown when using the App. Only for type=enum:static |
| request | object | Request object when the source is dynamic. Only for type=enum:rpc |
Mapping Object in the Request Object
| Name | Data Type | Description |
|---|---|---|
| type | enum | Field type, supported value: select |
| path | string | String in a JSON path format, for response data array |
| value | string | String in a JSON path format based on the path results. This is the real value returned when a label is selected |
| label | string | String in a JSON path format based on the path results. Displayed in the drop-down list as label |
Examples
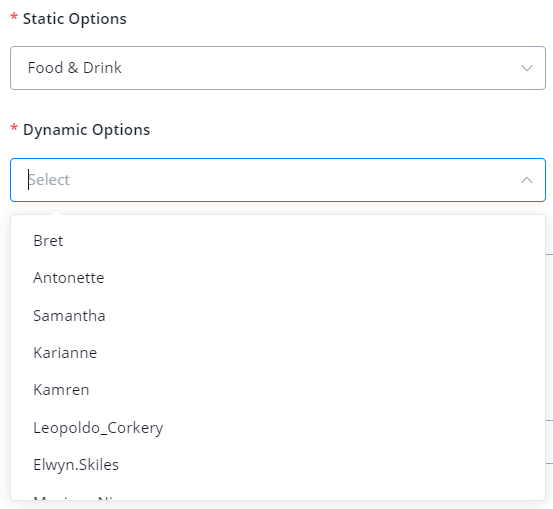
Forms in Actions block:
"forms": [ { "name": "static_options", "type": "select", "title": "Static Options", "source": "product_type_list" }, { "name": "dynamic_options", "type": "select", "title": "Dynamic Options", "source": "users_list" } ]
Sources block:
[ { "name": "product_type_list", "type": "enum:static", "list": [ { "value": "food", "label": "Food & Drink" }, { "value": "toy", "label": "Toys" }, { "value": "phone", "label": "Mobile Phone" } ] }, { "name": "users_list", "type": "enum:rpc", "request": { "url": "https://jsonplaceholder.typicode.com/users", "method": "GET", "headers": { "Content-Type": "application/json" }, "mapping": [ { "type": "select", "path": "$", "value": "$.id", "label": "$.username" } ] } } ]
![]() TIP – the request object in dynamic sources has been explained in the Action block, check parameters details of the request object.
TIP – the request object in dynamic sources has been explained in the Action block, check parameters details of the request object.
App UI:

Triggers
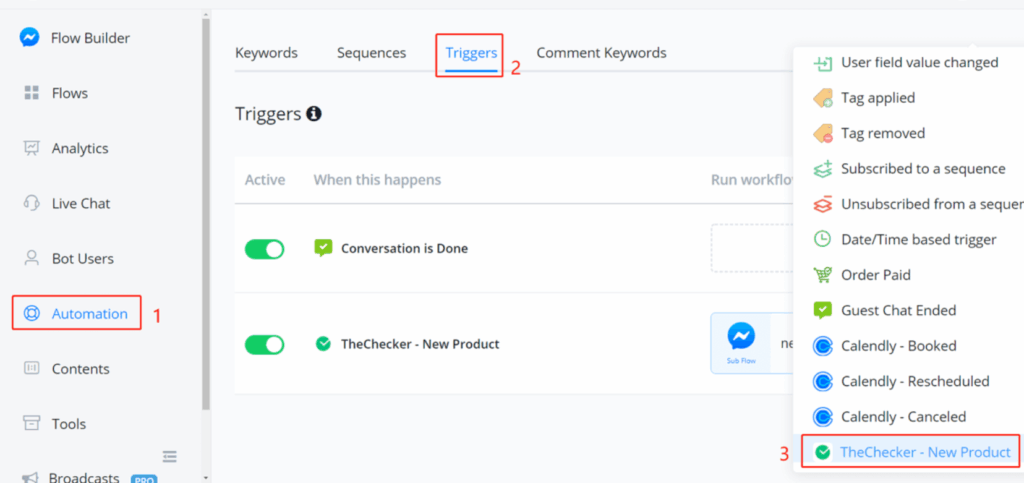
By setting triggers, users can use the triggers from the automation section like any other built-in triggers shown in the above screenshot.
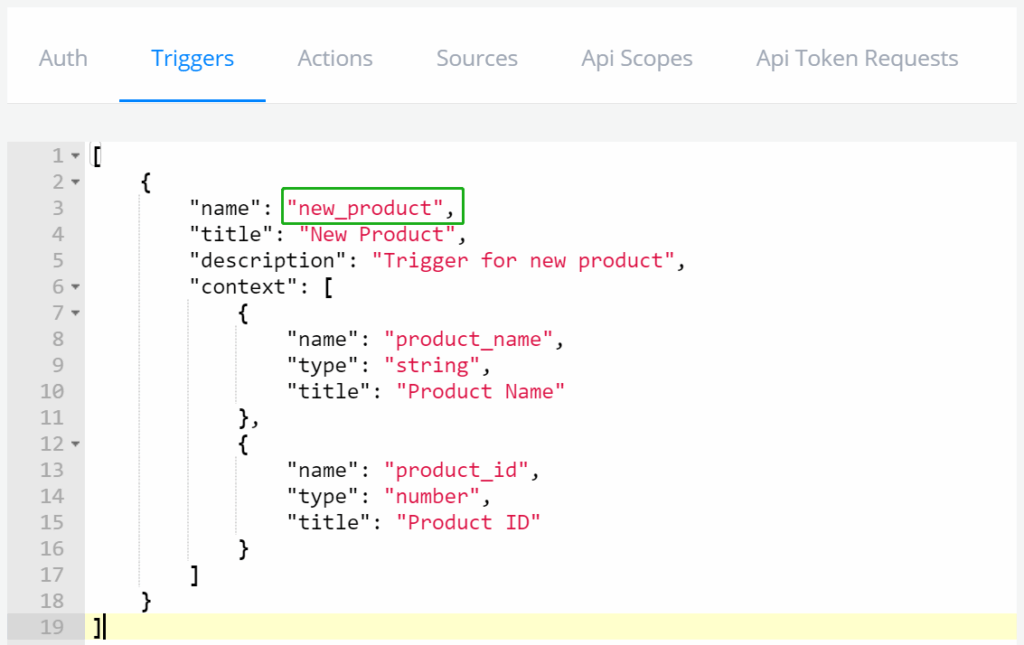
Please note that the trigger name has to be:
- in lower case
- unique in the trigger list
- no space, you can separate words by underscores
Context is where you list all the pre-set variables when data coming in.
After setting the trigger, you will need to configure the “API Token Requests” and select the API in “API Scopes”, see guidance below.
Api Scopes
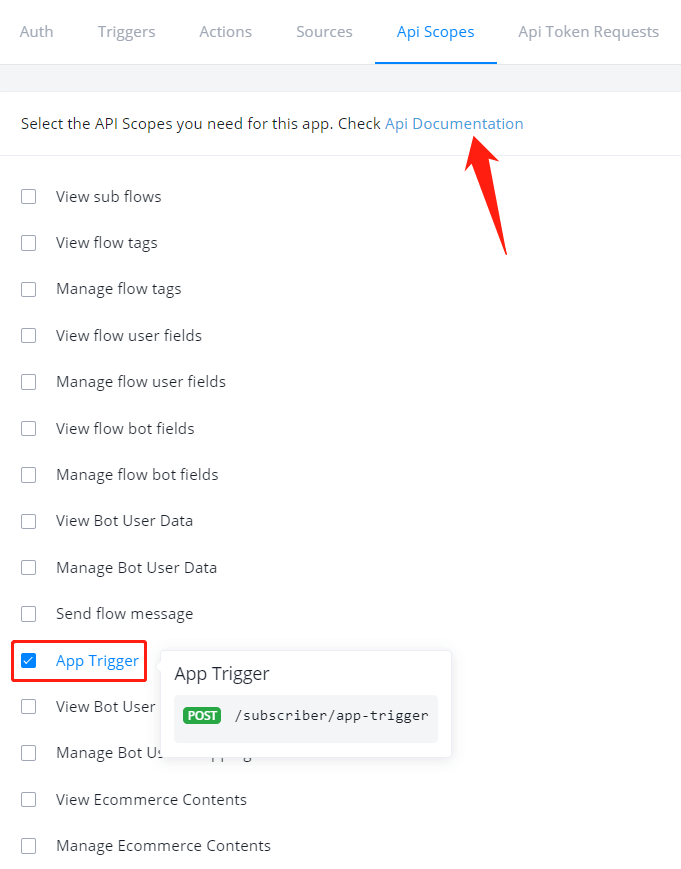
In “Api Scopes”, select all the APIs that your mini-app need to access. Check “Api Documentation” via the link on the top.
For example, if your app needs to view users’ tag list in their flow, select “View flow tags”. Besides, if you need to use triggers in your app, do select the “App Trigger” in the screenshot above.
Api Token Requests
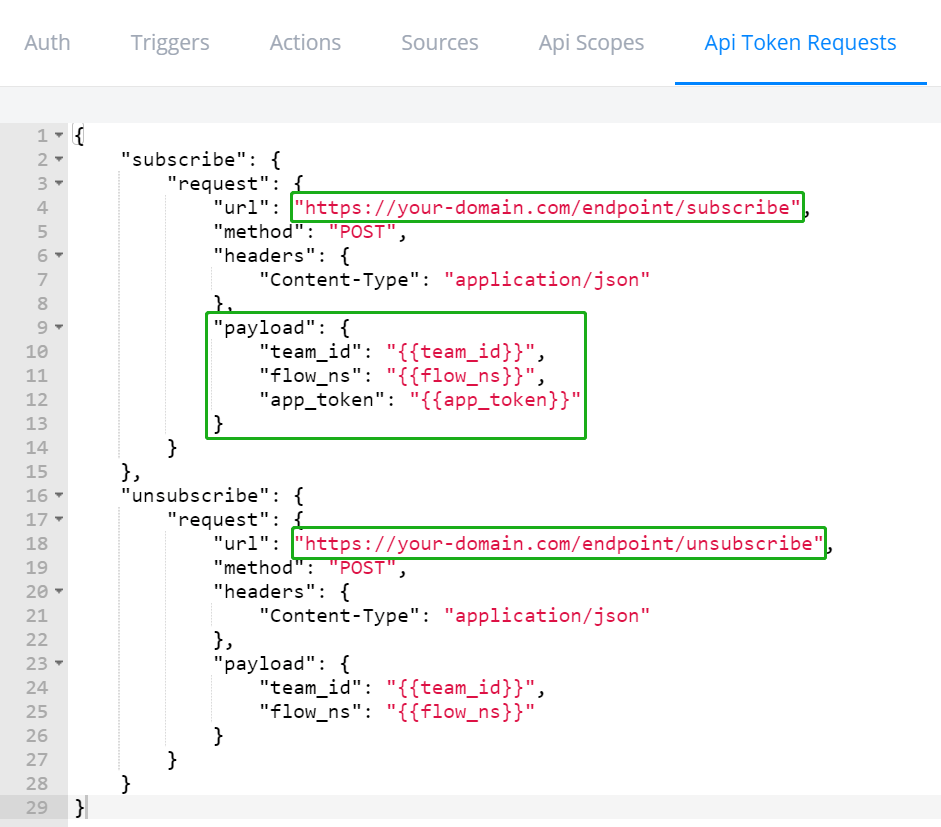
In “Api Token Requests”, click the “Requests” sample data at the bottom, and edit the URL address to your endpoint for subscription and unsubscription. Also, have a check at the bottom for available system fields and put what information you need in the payload. For example, do include “app_token” in the payload if you need to access users’ flow via API (if you select any API in Api Scopes block).
Save & Test
Finally, click “Save” to finish the creation. Congrats!! You’ve just made a Mini-App successfully.💯💯
If you are just using the app in your own workspace, then you don’t need to publish the app. You can test it and use it in any bot of any channel in your workspace.
To share the app to other workspaces, you will need to publish your app in ihakimi mini-app store.


